-
pcWRT DDNS Setup Guide: Free & Easy Remote Access in 2 Minutes
Are you tired of losing your VPN connection every time your ISP changes your home IP address? You are not alone. Dynamic public IPs are the number one headache for remote access—but the pcWRT router has a built‑in cure.
With the native pcWRT DDNS feature, you can assign a fixed, memorable domain name (like
myhome.pcwrt.net) to your ever‑changing public IP. In this guide, I’ll show you how to configure Dynamic DNS on your pcWRT router using the native service or popular third‑party providers via DNS‑O‑Matic.What you’ll need before starting:
- A pcWRT router running firmware v2.0.1 or higher.
- Access to the router’s admin panel (usually
192.168.10.1). - (For Option 2) An account with a third‑party DDNS provider like DuckDNS or No‑IP.
Table of Contents
- What is DDNS and Why Do You Need It?
- Option 1: Native pcWRT DDNS (Recommended)
- Option 2: Third‑Party DDNS via DNS‑O‑Matic
- How to Verify Your DDNS is Working
- Frequently Asked Questions (FAQ)
- Final Verdict
1. What is DDNS and Why Do You Need It?
Dynamic DNS (DDNS) is a service that automatically updates the DNS records for a domain name whenever your router’s public IP address changes.
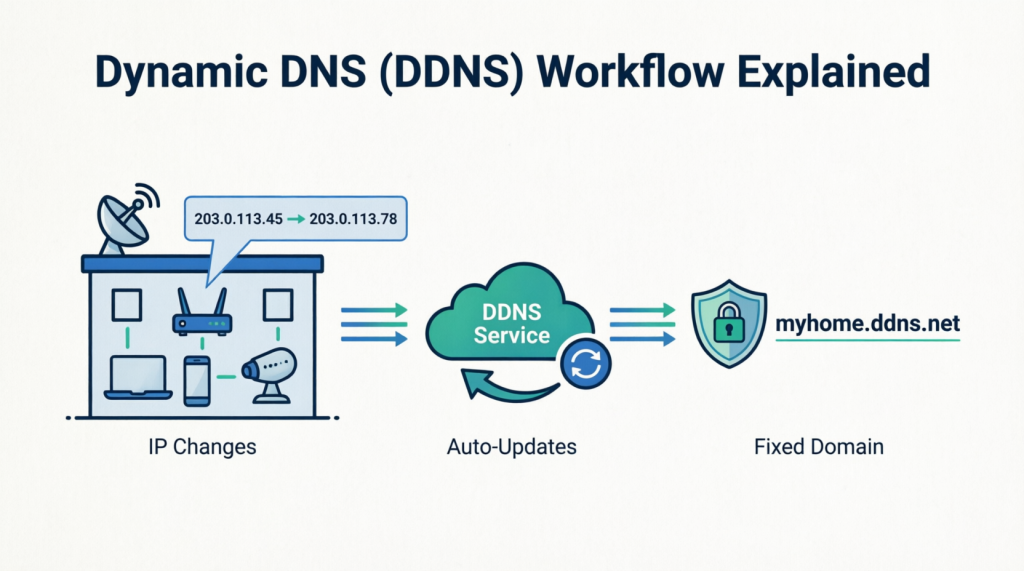
Think of it as a phonebook that updates itself in real‑time. Without DDNS, you’d have to manually check your WAN IP every few days and reconfigure your remote tools. With DDNS on pcWRT, you get a permanent, static hostname that always points to your current IP — making it essential for:
- Hosting a personal VPN server.
- Accessing your home NAS or media server.
- Remote monitoring (security cameras).
- Managing your router settings from outside your local network.
pcWRT gives you two flexible paths to achieve this, outlined below.
2. Option 1: Native pcWRT DDNS (Recommended)
Starting with firmware v2.0.1, pcWRT includes a free, integrated DDNS service. There is zero registration, no monthly fees, and it takes under 60 seconds to activate.
Step-by-Step Setup for Native DDNS
- Log in to your pcWRT administration dashboard (default IP:
192.168.10.1). - Navigate to Settings > System > General.
- Check the box labeled “Enable DDNS with pcwrt.net”.
- In the DDNS Name field, type your desired subdomain prefix (e.g., myhome). Your final URL will be
myhome.pcwrt.net. - Click Save and wait for the confirmation banner.
That’s it! The router will automatically update the
pcwrt.netDNS records whenever your ISP assigns a new public IP.💡 Pro Tip for VPN Users: If you are using the built‑in WireGuard, IKEv2/IPsec VPN or OpenVPN server, the “External Address” field pulls your DDNS name automatically. You don’t need to input it manually—just hand the domain to your remote clients.
3. Option 2: Third‑Party DDNS via DNS‑O‑Matic
If you prefer a custom domain (like
myhouse.duckdns.org) or want to update multiple DDNS services simultaneously, pcWRT supports DNS‑O‑Matic as a universal aggregator. This is the most efficient way to configure third-party Dynamic DNS on pcWRT.Step 1: Register Your Preferred DDNS Provider
Sign up with any supported provider—Duck DNS, Dynu, No-IP, or ClouDNS are excellent, free choices. Secure your hostname (e.g.,
myhouse.duckdns.org).Step 2: Activate DNS‑O‑Matic
- Create a free account at OpenDNS and log in to DNS‑O‑Matic.
- Click “Add a Service” and pick your DDNS provider from the dropdown.
- Enter the login credentials you used for that specific provider.
- Click “Update account info” to save the connection.
Step 3: Configure pcWRT to Use DNS‑O‑Matic
- Navigate to Apps > Dynamic DNS.
- Select dnsomatic.com as the service provider.
- Enter your OpenDNS / DNS‑O‑Matic username and password.
- Save the settings.
The router’s built‑in updater will now push your current public IP to DNS‑O‑Matic, which simultaneously relays it to all connected third‑party services.
4. How to Verify Your DDNS is Working
After setting up your pcWRT dynamic DNS, it’s crucial to confirm that the IP has propagated:
- Go to the Status page on your router to see your current public IP. It is displayed under the Internet section.
- Open your terminal or command prompt and run:
ping yourdomain.pcwrt.net(or your third‑party domain). If you’re running ping from an external network, the router may not respond since it’s configured not to respond to pings from the public Internet. But the IP address should display nonetheless. - Check if the returned IP address matches the one on your Status page.
Note: DNS propagation can take up to 5–10 minutes. If it doesn’t work immediately, wait a bit and check again.
5. Frequently Asked Questions (FAQ)
Q: Is DDNS safe? Does exposing my router put me at risk?
A: The DDNS service itself only maps a name to an IP — it does not open any security holes. However, always use strong admin passwords and enable firewall rules. If you are using it for VPN, ensure your VPN encryption is robust (pcWRT’s IKEv2 is highly secure).Q: How often does pcWRT update the IP address?
A: For pcWRT native DDNS, the router triggers an update the moment your ISP renews or changes your public IP. For third party DDNS, the checking interval is configured in the Dynamic DNS page (default every 10 minutes).Q: My ISP uses CGNAT (IP starts with 100.64.x.x). Will DDNS work?
A: No. DDNS requires a real, publicly routable IP. If you are behind Carrier‑Grade NAT, the domain will point to an unreachable address. You will need to contact your ISP and request a dedicated public IPv4 address (they often grant it for free).Q: Can I use the native pcWRT DDNS and a third-party DDNS at the same time?
A: Yes you can. That said, the native pcWRT option is usually sufficient for 99% of home users.6. Final Verdict: Which Option Should You Choose?
Feature Native pcWRT DDNS Third-Party via DNS-O-Matic Setup Time ~1 minute ~5 minutes Cost Free Free (or paid for premium) Domain *.pcwrt.netCustom (e.g., DuckDNS, No-IP) Best For Ease of use & instant VPN pairing Users with brand preferences or multiple hostnames My recommendation: If you are setting up remote access for the first time, choose Option 1 (Native pcWRT DDNS). It is the fastest, most reliable solution, and it integrates beautifully with the router’s VPN server. Reserve Option 2 only if you absolutely need a specific external domain.
Once configured, your pcWRT DDNS will run silently in the background. You will never have to memorize an IP address again—just your personal domain. Enjoy seamless remote access to your home network!
Have a question about your specific setup? Drop a comment below, and I will help you troubleshoot.



Recent Posts
- pcWRT VPN Router for Business: Set Up a Site-to-Site WireGuard VPN in Minutes
- How to Set Up a Router-to-Router WireGuard VPN Behind CGNAT (pcWRT Guide)
- pcWRT DDNS Setup Guide: Free & Easy Remote Access in 2 Minutes
- Double VPN, multi-hop VPN, VPN chaining, what is it?
- VPN Split Tunneling and Split Tunneling Two Separate VPN Connections with the pcWRT Router
Recent Comments
- on How to allow or block web sites on the router
- on How to allow or block web sites on the router
- on How to allow or block web sites on the router
- on Monitor activities on your home network
- on How to reset the pcWRT router
Archives
- August 2026
- May 2026
- February 2026
- January 2025
- December 2024
- June 2024
- April 2024
- March 2024
- August 2023
- May 2023
- February 2023
- June 2022
- December 2021
- November 2021
- August 2021
- January 2021
- December 2020
- October 2020
- August 2020
- July 2020
- June 2020
- May 2020
- April 2020
- February 2020
- January 2020
- December 2019
- October 2019
- December 2018
- August 2018
- July 2018
- June 2018
- January 2018
- November 2017
- October 2017
- September 2017
- August 2017
- July 2017
- June 2017
- January 2017
- August 2016
- May 2016
- December 2015
- August 2015
- July 2015
- May 2015
- April 2015
- March 2015
Categories


