-
How to Set Up a Router-to-Router WireGuard VPN Behind CGNAT (pcWRT Guide)
Setting up a WireGuard VPN behind CGNAT is a common headache for home networkers and small businesses. Carrier-Grade NAT (CGNAT) means your ISP hides your router behind a shared public IP, making it impossible for external clients to initiate a traditional inbound connection.
Most tutorials tell you to pay for a static IP or use a costly relay server. But there is a smarter, free workaround: reverse the connection initiation. If your client side has a public IP, your server (stuck behind CGNAT) can simply reach out and establish the tunnel.
While this usually requires complex terminal commands, the pcWRT router simplifies it into a few mouse clicks. In this comprehensive guide, I’ll walk you through creating a secure router-to-router WireGuard VPN where the server lacks a public IP.
Prerequisite: Avoid IP Conflicts
Before starting, ensure your two routers are on different LAN subnets. For this tutorial:- Router A (Server) – Behind CGNAT. LAN:
192.168.10.1 - Router B (Client) – Has a public IP. LAN:
192.168.20.1
What Does It Mean to Run a VPN Server Behind CGNAT?
CGNAT is widely used by mobile and fiber ISPs to conserve IPv4 addresses. It hides your router behind a secondary NAT layer. While this improves ISP efficiency, it breaks port forwarding and direct VPN connections. The solution? Let the server initiate the handshake to the client, effectively punching through the NAT barrier without needing inbound ports open.
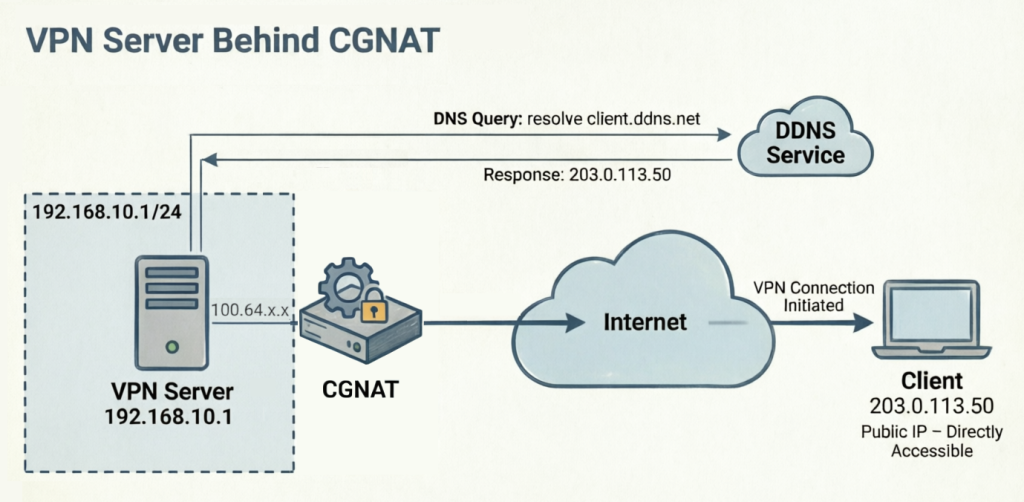
Step 1: Configure DDNS on the Public Client (Router B)
Because Router B (the client) has a public IP — which is likely dynamic — you need a fixed domain name so Router A can find it. pcWRT’s built-in DDNS makes this effortless.
- Log in to Router B.
- Navigate to Settings → System
- Under the General section, check the box labeled “Enable DDNS with pcwrt.net“
- Enter your preferred DDNS Name (e.g.,
myoffice.pcwrt.net). This will be the address that Router A uses to locate Router B. - Click the Save button under the General section.
- Optional: If you haven’t already, change Router B’s LAN IP to
192.168.20.1underSettings→LANto keep it distinct from Router A’s192.168.10.1
Step 2: Create the WireGuard Peer on the Server (Router A)
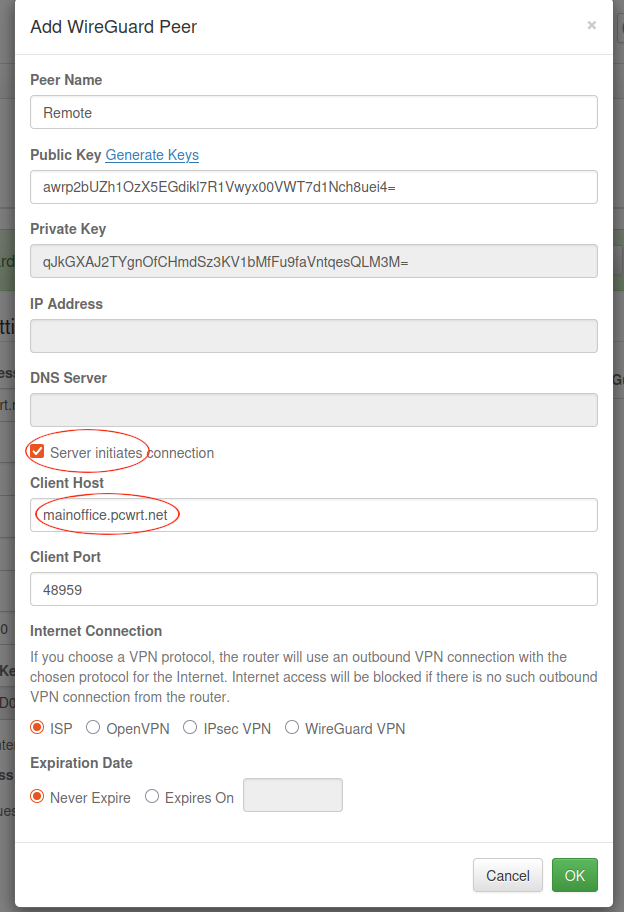
This is the most critical step. We will configure Router A (the CGNAT-bound server) to actively reach out to Router B.
- Log in to Router A.
- Go to Apps → WireGuard and select the Server tab.
- Under Peers, click the Add button.
- In the popup dialog:
- Enter a Peer Name (e.g.,
Client-Office). - Click Generate Keys to create your encryption keys automatically.
- Crucially, check the box labeled “Server initiates connection”. This is the secret sauce that makes a VPN work without a public IP.
- In the Client Host field, paste the DDNS name from Step 1 (e.g.,
myoffice.pcwrt.net).
- Enter a Peer Name (e.g.,
- Click OK, then click the main Save button at the bottom.
- Click the Download icon next to your new peer to save the configuration file (
.conf) to your computer.
Step 3: Import the Config on the Client (Router B)
Now, transfer the generated configuration to the client side so it can accept the incoming connection from the CGNAT server.
Important: Perform this step on Router B, not Router A.
- Log in to Router B.
- Go to Apps → WireGuard.
- Under Connections, click the Add button.
- In the popup:
- Enter a Connection Name.
- Click Upload WireGuard Config and select the
.conffile downloaded from Router A.
- Click OK.
- (Recommended) Check the Auto-start box so the VPN tunnel initiates automatically on every reboot.
- Click Save.
Step 4: Verify the Site-to-Site VPN Tunnel
After saving, it’s time to confirm the routers have successfully negotiated the WireGuard handshake.
On Router B (the VPN client), click the Play icon to start the VPN connection. The Status icon on the Connection line will turn green after successful VPN connection.
Step 5: Test Cross-LAN Connectivity
You should be able to access the devices on Router A’s LAN network, if you enabled it (i.e., the LAN box is checked under Network Access on Router A’s server configuration.
- From a device on Router B’s LAN, ping Router A’s IP: ping 192.168.10.1
- From a device on Router B’s LAN, ping a device on Router A’s LAN: ping 192.168.10.50
Troubleshooting Common WireGuard CGNAT Issues
- Log in to the VPN client router (Router B in this example), check the Status icon on the Connection line. The icon should be green if the connection is successful.
- Click on the logs icon to see the connection logs.
- Since the server tracks the client via DDNS, sometimes the connection will be lost after an IP address change on the client. E.g., when your ISP changed the client router’s IP address, or just after a router reboot. The routers will usually reconnect given a few more minutes.
Frequently Asked Questions (FAQ)
Can WireGuard work without a public IP?
Yes. As demonstrated in this guide, WireGuard can work perfectly behind CGNAT by having the server (which lacks a public IP) initiate the connection to a client that does have a public IP.What is the difference between a WireGuard client and server?
Traditionally, the server listens for connections. In a CGNAT scenario, we reverse these roles. The device behind CGNAT acts as the “server” in terms of network resources but acts as the initiator to establish the tunnel.Is this setup secure if my client has a public IP?
Yes. WireGuard uses state-of-the-art cryptography (ChaCha20-Poly1305). The public IP merely facilitates the connection; all data traversing the tunnel is heavily encrypted.Conclusion: Mastering WireGuard Behind CGNAT
Overcoming CGNAT doesn’t require expensive static IPs or third-party relay services. By leveraging the “Server initiates connection” feature on your pcWRT router, you can establish a robust router-to-router WireGuard VPN in just a few minutes.
Whether you are linking two office networks, accessing remote security cameras, or managing off-site servers, this setup gives you secure, low-latency access to your remote LAN — even when your ISP hides your server behind double NAT.
Have questions or run into a specific error? Drop a comment below! Our team (and the pcWRT community) is here to help you get your VPN behind CGNAT running smoothly.
- Router A (Server) – Behind CGNAT. LAN:


Recent Posts
- pcWRT VPN Router for Business: Set Up a Site-to-Site WireGuard VPN in Minutes
- How to Set Up a Router-to-Router WireGuard VPN Behind CGNAT (pcWRT Guide)
- pcWRT DDNS Setup Guide: Free & Easy Remote Access in 2 Minutes
- Double VPN, multi-hop VPN, VPN chaining, what is it?
- VPN Split Tunneling and Split Tunneling Two Separate VPN Connections with the pcWRT Router
Recent Comments
- on How to allow or block web sites on the router
- on How to allow or block web sites on the router
- on How to allow or block web sites on the router
- on Monitor activities on your home network
- on How to reset the pcWRT router
Archives
- August 2026
- May 2026
- February 2026
- January 2025
- December 2024
- June 2024
- April 2024
- March 2024
- August 2023
- May 2023
- February 2023
- June 2022
- December 2021
- November 2021
- August 2021
- January 2021
- December 2020
- October 2020
- August 2020
- July 2020
- June 2020
- May 2020
- April 2020
- February 2020
- January 2020
- December 2019
- October 2019
- December 2018
- August 2018
- July 2018
- June 2018
- January 2018
- November 2017
- October 2017
- September 2017
- August 2017
- July 2017
- June 2017
- January 2017
- August 2016
- May 2016
- December 2015
- August 2015
- July 2015
- May 2015
- April 2015
- March 2015
Categories


